3 Essential Garage Setup Ideas for Overland Adventures
A well-organized garage is the cornerstone of any successful overland expedition. Efficient storage solutions like heavy-duty shelving and modular wall systems allow travelers to categorize gear by frequency of use and environmental demands.

This level of organization reduces the time spent on pre-trip preparation and ensures that critical safety equipment is always accessible when needed. Optimizing the workspace within a garage involves more than just tidying up.
Integrating specialized lighting and dedicated maintenance stations provides the necessary environment for conducting routine vehicle inspections and repairs. These upgrades empower vehicle owners to manage their own mechanical readiness, which is essential for ensuring reliability during long-range travel through remote terrain.
Keep reading to explore three practical setup ideas that will turn your garage into the ultimate staging ground for your next wilderness journey.
1. Build a Heavy-Duty Maintenance Station
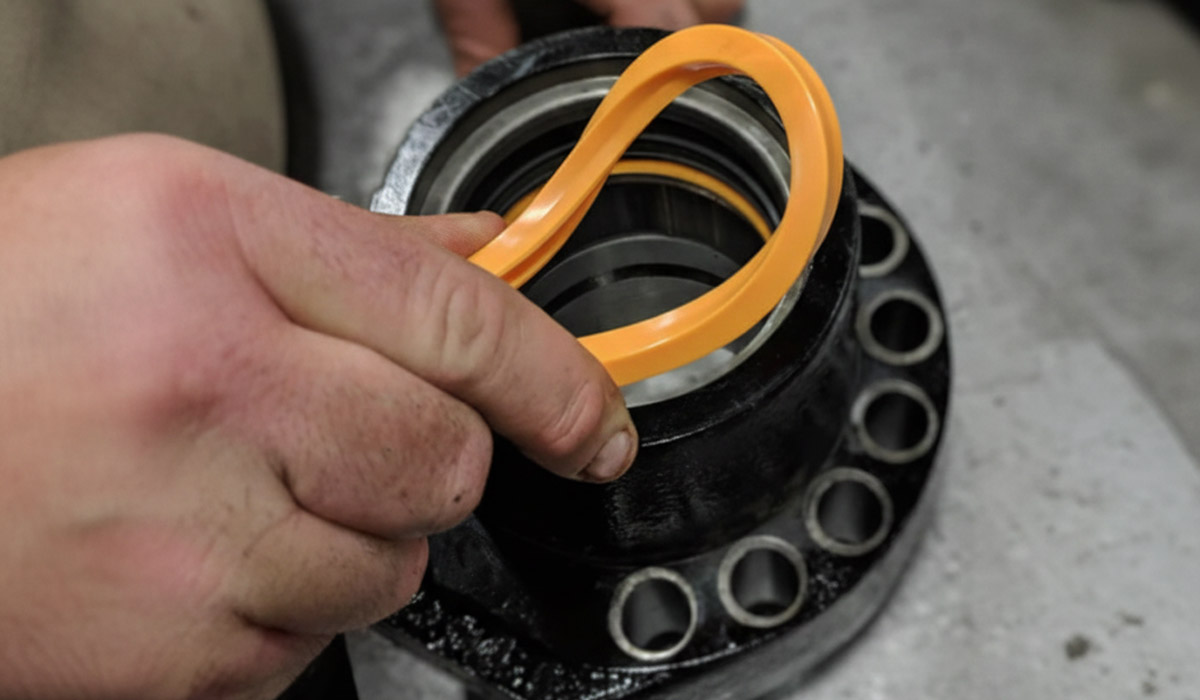
Photo from HW Part Store
Overlanding vehicles are significantly heavier and more complex than your average commuter car. Between the added weight of steel bumpers, roof racks, and winches, your garage needs to be equipped to handle serious mechanical stress. One thing that often gets overlooked in a garage setup is having the right inspection tools on hand. A good vehicle inspection mirror with wheels makes it so much easier to check the underside of your rig without having to crawl around on the floor, which is a small investment that saves a lot of time during pre-trip checks.
A standard DIY toolkit often falls short when you are performing deep maintenance or custom fabrication on a rig built for the bush.
To keep your vehicle trail-ready, consider setting up a dedicated workstation modeled after professional heavy equipment shops. This means investing in high-quality storage and sourcing components that can withstand extreme wear.
Optimize for Hydraulic Reliability and Precision
Many modern overlanding setups rely on hydraulic jacks, heavy-duty presses, or even custom suspension components that require industrial-strength seals to function under pressure. In a home garage, the last thing you want is a seal failure during a pre-trip inspection.
For those who dive into custom builds or heavy repairs, utilizing robust excavator parts from HW Part Store can be a clever way to integrate industrial-grade hydraulic seals or hardware into your garage setup.
These components are designed for the grueling environments of a construction site, making them an excellent choice for overlanders who demand that same level of "fail-proof" engineering in their own workspace.
When your garage mirrors the reliability of heavy machinery, you gain the confidence that your rig will hold up when you are miles away from the nearest paved road.
Pro Tip: Upgrade your rig's reliability by sourcing industrial-grade hydraulic hoses and seals. These heavy-duty components, designed for construction sites, offer superior resistance to off-road punishment compared to standard automotive parts.
2. Maximize Workspace with Vertical Storage Solutions
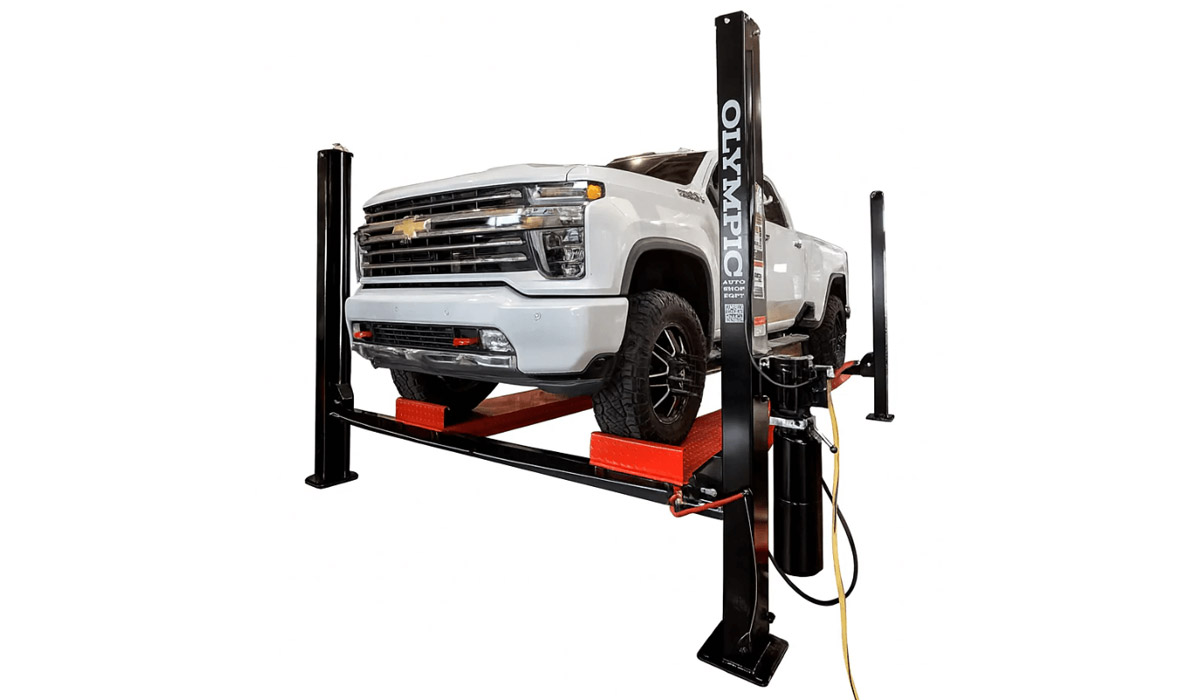
Photo from HeavyLift Direct
The biggest challenge with a dedicated overlanding garage is managing the footprint of a fully equipped rig. Between oversized tires and high-clearance suspensions, these vehicles take up a massive amount of floor space, often leaving little room for gear storage or secondary projects. To solve this, savvy adventurers are looking upward to reclaim their floor area.
The Benefits of a Professional Grade Lift
Investing in a heavy-duty lift is the ultimate game-changer for a home shop. It allows you to perform comfortable under-chassis inspections, such as checking torque on suspension bolts or inspecting skid plates after a muddy trek.
Furthermore, it serves as a secondary storage solution, allowing you to park a second vehicle or store heavy gear directly beneath your rig.
Integrating a 4-post automotive lift from HeavyLift Direct into your setup provides the stability and weight capacity necessary for heavy 4x4 vehicles. Unlike portable jacks that can feel unstable under a loaded truck, a 4-post system offers a wide, secure base that is ideal for both long-term storage and intensive mechanical work.
Pre-Trip Tasks Made Easy
Having your vehicle at eye level transforms the "pre-flight" ritual from a chore into a streamlined process:
- Inspections: Perform 360° undercar inspections in minutes.
- Torque Checks: Handle suspension torque checks without crawling on concrete.
- Tire Rotations: Execute one-person tire rotations by storing the spare on the runway while you work.
- Maintenance: Driveline and skid-plate bolt retorques can be done at standing height.
By getting your vehicle off the ground, you turn a cramped garage into a multi-level workshop where every square inch is utilized for adventure prep.
Key Insight: A 4-post lift transforms maintenance from a chore into a precise safety protocol. Standing-height access allows for thorough 360-degree inspections, revealing hidden leaks or stress cracks often missed when crawling on the floor.
3. Create a Gear-Staging Command Center
The difference between a stress-free departure and a frantic morning usually comes down to how your gear is staged. An overlanding rig carries an immense amount of equipment, recovery boards, kitchen kits, sleeping systems, and water storage that often sit in a cluttered pile when not in use.
A dedicated command center ensures every piece of gear has a "home base" where it can be inspected, cleaned, and organized.
Streamline Your Loading Process
A staging area should be more than just shelves. Think of it as a pre-trip laboratory where you can lay out your entire kit before it goes into the vehicle. By using a combination of heavy-duty slatwalls and labeled bins, you can visualize your inventory and spot missing items before you are miles from civilization.
- Inventory Tracking: Use a dry-erase board to list must-have items, ensuring nothing is left behind during the excitement of packing.
- Power Management: Install a dedicated charging station for your portable power banks, GPS units, and satellite communicators so they are at 100% the moment you roll out.
- Modular Storage: Utilize uniform crates that stack perfectly in your rig’s drawer system, making the transition from garage shelf to vehicle cargo area seamless.
When you treat your garage as a launchpad rather than just a storage unit, you reduce the mental load of preparation. This command center allows you to focus on the journey ahead, knowing that your gear is as ready for the trail as your vehicle is.
Pro Tip: Implement the "Load left, launch right" workflow to streamline your packing. Treating your garage staging area like a linear pit-crew lane prevents backtracking and ensures no critical gear is left behind.
The Path Forward
From bulletproof spare parts to an at-home lift and a slick gear-staging zone, these three upgrades transform any garage into a true adventure launch pad. Start small, maybe label a parts bin this weekend, or go big with a lift install before your next remote expedition. Either way, your future self will thank you when you roll out ready for anything.